| Page orientation and borders
Depending on what type of label sheets you are using you can change the
page orientation or the paper size.
To change the paper size, click the "Printer settings" icon

You should use borders if you are printing labels on plain paper. When
printing on label sheets, you do not need borders. There are five border
types available: Solid, Dash, DashDot, DashDotDot and Dot.
Label Size
Use "Width" and "Height" to set dimensions
of labels. Label dimensions can be entered only in mm.
Page Margins, Spacing, Count and Alignment
Use Page Margins to position labels on the sheet.
Some label manufacturers have the information about labels position
printed on sheets. If not, you should measure your label sheet to
determine the exact position of labels. Then use the settings to
align the text so it is printed on labels precisely.
To set the number of rows and columns use "Row
count" and "Column count" properties.
To set the space between rows and columns use "Horizontal
spacing" and "Vertical spacing" properties.
The alignment is set for all fields at once.
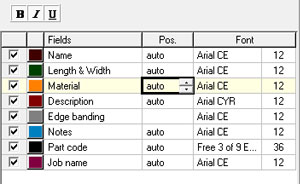
Configuring label fields (text
lines)
|
To set the position of each field within the label type
the new position into the "Pos." column or use the small Up&Down
buttons (recommended) to increase or decrease the field position. To let
the program position each field automatically enter "0" or "auto".
To disable a particular text line uncheck its checkbox.
To change the color of a particular text line: click
the color button  next to its checkbox and choose a new color from the color dialog that
pops up.
next to its checkbox and choose a new color from the color dialog that
pops up.
To change the text style attributes of a particular text
field: select the desired field and click the text style buttons  . .
The "Part code" field can be printed as barcode
if a barcode font is selected. Smart2DCutting comes with a barcode font
called "Free 3 of 9 Extended". If you have other barcode fonts
installed on your system you can select them from the fonts list. The
"Barcode start/stop char" specify the start/stop
character used when printing the barcode. A valid "3 of 9 barcode"
have to begin and end with a special character. Scanners look for this
character to know where to start and stop reading the barcode. This special
character is represented in this font with the '*' character. The barcode
readers will not include the * in the text they return.
Please note that for other barcode fonts the start/stop character might
be different or it might not be needed at all. You should consult your
barcode reader documentation to find out the start/stop character they
expect.
All changes you make in the active Label Style are automatically saved.
Use the  and
and  buttons to add or remove label styles.
|
 button from the buttons bar. You can change the starting label position
by increasing the "Start label" value in the print preview
window.
button from the buttons bar. You can change the starting label position
by increasing the "Start label" value in the print preview
window.


